This document contains instructions on how to simply connect to all Tabor Electronics devices via their GPIB & LAN ports. This document covers all bench-top models.
- To connect via the GPIB/LAN port:
1. To activate the required interface, access the Select Interface screen
2. Select the desired interface.
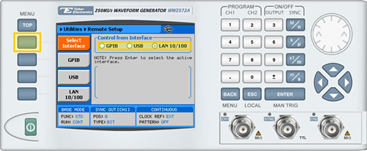
- For WW, PM and WS models, press the TOP menu button, then select Utilities >> Remote Setup, select the GPIB or LAN option, and press ENTER.
The following figure depicts the interface selection using the WW series.

- For WX and WS 8351/2 models, press the Utility control button and then the Select Interface menu button.
The following figure depicts the interface selection using the WX series.

3. Set up a physical GPIB or LAN connection between the PC and the Tabor device. (When making a direct LAN connection, between the PC and a WW Tabor device it is necessary to use a cross-wired cable).
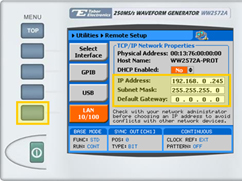
4. If you are making a LAN connection, press on the LAN menu button. Modify the IP Address, Subnet Mask, and Default Gateway as necessary to ensure TCP/IP connectivity between the Tabor device and the PC. Press ENTER to save the changes.

5. Check the IP connectivity between the two systems using a ‘ping’ command.
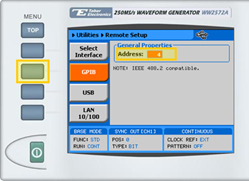
6. If you are making a GPIB connection, press on the GPIB menu button. Modify the Address number as necessary to ensure GPIB connectivity between the Tabor device and the PC. Press ENTER to save the changes.

For More Information
To learn more about Tabor’s solutions or to schedule a demo, please contact your local Tabor representative or email your request to [email protected]